Tuesday, 8 August 2017

Brief Setup on Ubuntu UFW

As security is elusive ever since mankind invented encryption methods. It is important to set some form of wall to keep some marauding data thieves out of the walled 'data' garden. The old timeless saying of 'better late than never' rings true in this context.

A firewall is a basic protection for personal consumers since the late 1990s when internet usage becomes prevalent. In Ubuntu 16.04, the firewall typically consists of UFW (Uncomplicated Firewall). There is a graphical front-end but if you prefer to use commandline or your
computer is in need of more computing resource, the UFW is your preferred choice.

This brief is on setting up Ubuntu UFW using the gnome console or terminal using relatively simple rules (in comparison to setting up the Linux Firewall using iptables).

As an average user, we need to open certain ports to access the internet. Without a firewall, the 'attack surface' (as security commentators commonly use it to label the 'connection loopholes' that cyber 'predator' discover to 'listen' on its 'prey' ) is big enough to break into and is detrimental to your internet security.

The list of TCP and UDP and its concomitant service description can be found on the Wikipedia here.  If you are curious to know more in depth, you can go to the Internet Assigned Numbers Authority website (IANA website) to read further on the ports available.

To add rule to allow incoming access to your network, we execute the command:

sudo ufw allow 993/tcp

To delete rule that you have added, we execute the command:

sudo ufw delete allow 993/tcp

To add rule to allow outgoing access to the external network, we execute the command:

sudo ufw allow out 465/tcp

Similarly, to delete the outgoing rule we have added above, we execute:

sudo ufw delete allow out 465/tcp

To view the status of the UFW rules we have added to date, we execute:

sudo ufw status

That's all for today!

Attached is a screenshot of the UFW Rules (v6 stands for ipv6) and you can check /etc/default/ufw for the configuration:


Follow my blog with Bloglovin

Friday, 4 August 2017

Encrypted Storage: Create Encrypted File Container Ubuntu 16.04LTS

Luks-formatted file container on your harddrive or cloud storage solutions


In the year 2017, a lot of security issues surfaces, and ransomware are lurking in the cyberspace preying on the next victim. Be it the oft-quoted 'vulnerable operating system' like Windows, or other 'more secure' platforms like Linux kernel driven operating system or Macintosh operating system, once you are in the cloud, you are equally vulnerable.

Hence, we can take one small step in securing our data online. I have read this article on a security blog written by Nick Thomadakis from Cybrary, a education provider for IT security.

You can read on this website. Just be aware that you need to register to view the content or you can use chrome extension, ScriptSafe, to turn off the script giving the website to your browser.

Let's begin with the first approach (a casual approach to creating the file container) :


1st step:  let's search for the module dm_crypt (to know more: click on the attached link to Archlinux documentation on dm-crypt) which is an application to create a virtual partition using embedded cryptographic capability in the Linux kernel.

Run command: lsmod | grep 'dm_crypt'

If the module is loaded the following output should appear below the command:

dm_crypt                                     28672          0

2nd step: If not, we can always insert the dm_crypt module with the option verbose (-v) to see the module being activated.

Run command: sudo modprobe -v dm_crypt

3rd step: We proceed to install the Ubuntu package of dm-crypt known as cryptsetup. ( You can read the man pages by running command man cryptsetup )

Run command: sudo apt-get install cryptsetup

4th step: As the package is installed, we can now do the proper setup of the file container. We create a storage size depends on our own need. For example, i going to create a 500MB  file container on my Dropbox folder by navigating to the Dropbox folder and create a file container called 'crypt' using fallocate command.

Run command: cd ~/path/to/Dropbox
                         fallocate -l 500MB crypt

Note: Depends on your storage capacity on Dropbox or other media, you can create the file container size in multiplicative suffixes of following: KB, MB, GB, TB,  PB, EB, ZB and YB. (or alternative unit suffixes : KiB, MiB, GiB, TiB, PiB, EiB, ZiB, YiB.)

A 500MB file of unknown filesystem appears in my Dropbox folder. It is time to encrypt the file container with industrial strength application.

5th step: Let's start using the cryptsetup application to encrypt 'crypt' with LUKS format, a open source industrial grade encryption which claims to require several times the world GDP to break the encryption.

Run command: sudo cryptsetup luksFormat ~/path/to/Dropbox/crypt

We answer YES (uppercase letter please) to the prompt to overwrite 'crypt' file container irrevocably. We set the password (passphrase) which we need to open the 'crypt' file container. You can create a tough but easy to enter (on your laptop keyboard) password using a password manager like KeePass2 (or KeePassX) which is recommended because it is easily available on Android smartphone and Windows too for your day to day web surfing.

6th step: Now we open the luks-formatted 'crypt' file container in a intermediate holding folder, arbitrarily called 'decrypt' or you can use a simple 2-letter name like 'SG'. The command takes the format 'sudo cryptsetup luksOpen /path/to/source /path/to/holding'. Note the option 'luksOpen' as in the previous option 'luksFormat' has the uppercase character 'O' and 'F' respectively after the 'luks' prefix.

Run command: sudo cryptsetup luksOpen ~/path/to/Dropbox/crypt decrypt

7th step: Before we start saving any files, we need to create a proper filesystem on 'decrypt' folder which has the following path dev/mapper/decrypted_folder. In my case, i choose Ext4, which is stable since late 2009 (October 2009 release of Ubuntu 9.10).

Run command: sudo mkfs -t ext4 /dev/mapper/decrypt

8th step: Now we create an arbitrarily named folder in $HOME with root permission. In my case i create the folder called 'secondcrypt' so that the decrypted files is not easily editable by people with no root permission.

Run command: sudo mkdir ~/secondcrypt

9th step: We can now mount the 'decrypt' folder on 'secondcrypt' folder. Once done, we can start saving files in the folder with root permission. Note: some files are not saved easily when you use a application with no root permission to edit. Hence you need to save it in a temporary location and move it into the mounted 'secondcrypt' folder with root permission. Best is you can directly edit the file permission using sudo nautilus.

Run command: sudo mount /dev/mapper/decrypt ~/secondcrypt

10th step: Once we are done with saving our precious work, we proceed to dismount the 'secondcrypt' folder. Then we close the intermediate decrypted folder 'decrypt' using the command luksClose (in format sudo cryptsetup luksClose /path/to/holding) .

Run command: sudo umount ~/secondcrypt
                         sudo cryptsetup luksClose decrypt


Now, the serious Second approach that is more secure: 


We need to only alter the 4th step in comparison with the 1st approach that is maybe less secure. A reference is here which is written by Justin Ellingwood from DigitalOcean, a cloud infrastructure service provider. The file container referred to is hosted on a Virtual Private Server(VPS).

4th step: The move away from the above approach is due to the fact that the old, deleted files may exist beneath the allocated space that is now held by ~/path/to/Dropbox/crypt or 'crypt' file container. The encrypted data may be easily distinguished from the rest of the empty hard disk drive written with zeros and random data.

One way of securely erasing the old, deleted data is using dd command. ( You can read the man pages by running command man dd ). Below are the dd commands stated by Justin Ellingwood in the DigitalOcean blog.

'Most paranoid' Run command: dd if=/dev/random of=~/path/to/Dropbox/crypt bs=1M count=512
'Secure' Run command: dd if=/dev/urandom of=~/path/to/Dropbox/crypt bs=1M count=512
'Quite Secure' Run command: dd if=/dev/zero of=~/path/to/Dropbox/crypt bs=1M count=512

The main thing in how secure is the wipe of the allocated space is dependent on the input file path (if) assigned with the 3 pseudo-devices : /dev/zero, /dev/urandom, /dev/random.

The /dev/urandom pseudo-device is good enough to mimic the encrypted data that will be written into the 'crypt' file container.


Conclusion


Let's summarise the steps we may need in our daily life to store our data in the 'crypt' file container.

1st command: sudo cryptsetup luksOpen ~/path/to/Dropbox/crypt decrypt
2nd command:  sudo mount /dev/mapper/decrypt ~/secondcrypt
3rd command: sudo umount ~/secondcrypt
4th command: sudo cryptsetup luksClose decrypt


Happy encrypting our data!


Follow my blog with Bloglovin

Tuesday, 21 March 2017

Using HDSentinel in Ubuntu 16.04

If you are still using spinning harddrive, concerned about the health of your harddrive and using Linux/GNU, in particular, Ubuntu 16.04, you are in the right place

Running HDSentinel is quite simple in Linux. You need to download the file Hard Disk Sentinel LINUX (FREE) from http://www.hdsentinel.com/download.php

After extracting the file into your preferred directory, we export the path which is the directory using the command 'export' : export PATH=$PATH:/path/to/bin . Then, we can preserve the path enviroment to run HDSentinel using administrative sudo command: sudo -E env "PATH=$PATH" HDSentinel. Alternatively, we may need to edit the sudoers file to include the /path/to/bin using the command: sudo -E visudo and add /path/to/bin  in the line below Defaults  mail_badpass like this : Defaults        secure_path="/usr/local/sbin:/usr/local/bin:/usr/sbin:/usr/bin:/sbin:/bin:/snap/bin:/path/to/bin"

The change above in /etc/sudoers is differentated in light green (and yellow highlight) from the original in dark green. To double check the path in environment, use the command : sudo echo $PATH.

We are done and ready to run the command to check the health of our spinning Harddisk: sudo HDSentinel .


Follow my blog with Bloglovin

KeePass in Firefox on Fedora 25/Ubuntu 16.04: Passwords No Fear

If you are using KeePass on Fedora 25 or Ubuntu 16.04, you are in luck. There may be other addons or applications that may do the same task, KeePass is the used and tested application for storing passwords.

Background history: KeePass is built using Xamarin
 
Do try to use the default theme for Firefox, as there may be interface issue on a 3rd party theme.


Addons needed: PassIFox (either), KeeFox (either), KeePass Helper (optional).

First, you have to install the either one of the addons in Firefox:  KeeFox, or PassIFox. These are the two available addons to act as a go-between for KeePass and Firefox. Personally, i prefer KeeFox, since it has better support at keefox.org

After adding this, we need to install the Mono files (which the application is built on) and extract the pre-built KeePass zip file.

To install Mono is a breeze, just go to the official Fedora community website and execute the Quick command. In Ubuntu, use the apt-get command to install the package 'mono-complete'.

The Keepass Professional file is found here: http://keepass.info/download.html.

Download and extract the lastest to a directory you found convenient, for e.g., /home/your_username/KeePass

In this directory, create a 'plugins' folder and paste the keepassRPC.plgx file into 'plugins'. The plugin can be found at the developer github repository:
https://github.com/luckyrat/KeeFox

You are ready to create a new database in a local directory (in .kdbx format) ,create a key file (in .key format) and a master password.

Remember to set the database or one of the subcategory as KeeFox start group as shown in the picture below.


Now you are ready to go with Keepass integration with Firefox.

Follow my blog with Bloglovin

Tuesday, 12 July 2016

Debian 8 Jessie: Wireless mini PCI express Ralink RT3090sta Driver installation

Background: Linux Mint Debian running in Mate Environment

Prior to verify the model of you wireless Network Controller, it is important to ensure that Network Manager(which is default in Gnome and Mate) is running.


Issue command: sudo lshw -C network
Please note that *-network UNCLAIMED is shown prior to installing the required package listed below.

Ensure that your /etc/network/interfaces file is clean as mine:

source-directory /etc/network/interfaces.d
auto lo
iface lo inet loopback

The most you need to add are the three lines above.


From the above the model is RT3090 Wireless 802.11n
 PCIe.

Required package:  'firmware-ralink' and 'wireless-tools' package

Install the 'firmware-ralink' driver (perhaps 'wireless-tools' too if not already installed) to provide support for RT3090 driver.

Issue command: sudo apt-get update && sudo apt-get install firmware-ralink

Important: ensure no Ralink RT28xx driver is blacklisted in /etc/modprobe.d/blacklist.conf

Reboot the PC to allow the driver to initiate.

If the driver is not loaded up after the reboot, initiate the command :

sudo modprobe rt2800pci

If the 'firmware-ralink' is not working, you can try the alternative package 'rt3090-dkms' on Ubuntu thread : http://ubuntuforums.org/showthread.php?t=1669283 .

Hopefully it works by now and you can confirm it by running the command ifconfig or lshw -C network. The 'logical name' row (lshw -C network) is an indication that your device is identified.


Follow my blog with Bloglovin

Friday, 20 May 2016

Installing ffDiaporama Development Version in Fedora 23

Preliminary
As the maintainer for ffDiaporama is not maintaining the project, i decided to try out the development version which tends to be ahead of the stable version.

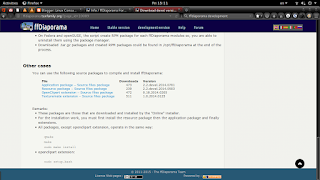
 Select the Linux button from ffDiaporama Landing site (http://ffdiaporama.tuxfamily.org/?page_id=3635) .

We shall see this page.


There is a script for Fedora, but i can't seem to get it to work. Hence, i downloaded the zip files found under the section "Other cases".

Download the three files, Resource package – Source files package,Application package – Source files package, Texturemate extension – Source files package.


Installing Qmake and other prequisites

 Go for Qt5


Installation prerequisites:
     sudo dnf groupinstall development-tools
     sudo dnf install gcc-c++
     sudo dnf install qt5-qtbase-devel qt5-qttools-devel qt5-qtsvg-devel qt5-qtbase qt5-qttools qt5-qtsvg qt5-qtimageformats qt5-qtmultimedia-devel qt5-qtmultimedia qt5-qtdeclarative-devel
     sudo dnf install ffmpeg ffmpeg-devel
     sudo dnf install SDL SDL-devel SDL_mixer-devel SDL_mixer
     sudo dnf install exiv2 exiv2-devel
      

     cd
     test -d bin || mkdir bin
     cd bin
     ln -s /usr/bin/qmake-qt5 qmake
     ln -s /usr/bin/lrelease-qt5 lrelease

NB: If previous "symbolic link" (to earlier Qt, e.g. Qt3 and Qt4, exists, please remove them (e.g. sudo rm qmake) and relink again (e.g. ln -s /usr/bin/qmake-qt5 qmake)


Editing Header files (cDeviceModelDef.h & -EncodeVideo.cpp)

NB: Prior to install "ffDiaporama.zip" if you r using ffmpeg 2.8.7 (or above, which i believe applicable to higher version)

#define RESAMPLE_MAX_CHANNELS SWR_CH_MAX
to
    #define RESAMPLE_MAX_CHANNELS 32

in cDeviceModelDef.h

Add in
   VideoStream->time_base                  = VideoFrameRate;  
 //ffmpeg 2.8.7 and above
right after the line
   VideoStream->codec->time_base           = VideoFrameRate;
in _EncodeVideo.cpp.

Installing ffDiaporama


NB: Do install ffDiaporama Resource before ffDiaporama Main. After installing ffDiaporama Main, you may proceed to install plugin like Texturemate and Openclipart.

Installing ffDiaporama Resource (ffdiaporama_rsc_2.2.devel.2014.0503.tar.gz)

1) Extract the file in your preferred workspace.
2) Compilation:
     qmake /PREFIX=/usr -o Makefile ffDiaporama_rsc.pro
     make
3) Installation:
     sudo make install

Installing ffDiaporama Main (ffdiaporama_bin_2.2.devel.2014.0701.tar.gz)

1) Extract the file in your preferred workspace.
2) Compilation:
     qmake ffDiaporama.pro /PREFIX=/usr
     make
3) Installation:
     sudo make install

Installing ffDiaporama Texturemate 
(ffdiaporama_texturemate_1.0.2014.0125.tar.gz)

1) Extract the file in your preferred workspace.
2) Compilation:
     qmake ffDiaporama_texturemate.pro CONFIG+=release
     make

3) Installation:
     sudo make install


 Installing ffDiaporama Openclipart
1) sudo dnf install openclipart

Happy making your Video Presentation on Fedora 23!


Follow my blog with Bloglovin

Sunday, 15 May 2016

Using LibreOffice to insert a ticked box

Operating System: Linux Mint Debian Edition
LibreOffice: 4.3.3.2

Insert> Special Characters> OpenSymbol>Select U+E531


Follow my blog with Bloglovin

Experimenting with Archlinux on Legacy Bios system

nano /etc/wpa_suppplicant/wpa_supplicant.conf    ctrl_interface=/run/wpa_supplicant    update_config=1 wpa_supplicant -B -i wlan0 -c /e...