Preliminary
As the maintainer for ffDiaporama is not maintaining the project, i decided to try out the development version which tends to be ahead of the stable version.
Select the Linux button from ffDiaporama Landing site (http://ffdiaporama.tuxfamily.org/?page_id=3635) .
We shall see this page.
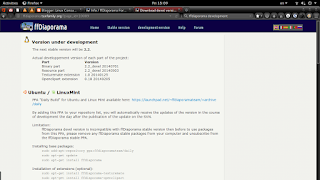
There is a script for Fedora, but i can't seem to get it to work. Hence, i downloaded the zip files found under the section "Other cases".
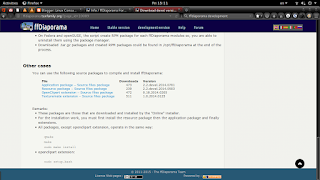 Download the three files, Resource package – Source files package,Application package – Source files package, Texturemate extension – Source files package.
Installing Qmake and other prequisites
Go for Qt5
Installation prerequisites:
sudo dnf groupinstall development-tools
sudo dnf install gcc-c++
sudo dnf install qt5-qtbase-devel qt5-qttools-devel qt5-qtsvg-devel qt5-qtbase qt5-qttools qt5-qtsvg qt5-qtimageformats qt5-qtmultimedia-devel qt5-qtmultimedia qt5-qtdeclarative-devel
sudo dnf install ffmpeg ffmpeg-devel
sudo dnf install SDL SDL-devel SDL_mixer-devel SDL_mixer
sudo dnf install exiv2 exiv2-devel
cd
test -d bin || mkdir bin
cd bin
ln -s /usr/bin/qmake-qt5 qmake
ln -s /usr/bin/lrelease-qt5 lrelease
NB: If previous "symbolic link" (to earlier Qt, e.g. Qt3 and Qt4, exists, please remove them (e.g. sudo rm qmake) and relink again (e.g. ln -s /usr/bin/qmake-qt5 qmake)
Editing Header files (cDeviceModelDef.h & -EncodeVideo.cpp)
NB: Prior to install "ffDiaporama.zip" if you r using ffmpeg 2.8.7 (or above, which i believe applicable to higher version)
#define RESAMPLE_MAX_CHANNELS SWR_CH_MAX
to
#define RESAMPLE_MAX_CHANNELS 32
in cDeviceModelDef.h
Add in
VideoStream->time_base = VideoFrameRate;
//ffmpeg 2.8.7 and above
right after the line
VideoStream->codec->time_base = VideoFrameRate;
in _EncodeVideo.cpp.
NB: Do install ffDiaporama Resource before ffDiaporama Main. After installing ffDiaporama Main, you may proceed to install plugin like Texturemate and Openclipart.
Installing ffDiaporama Resource (ffdiaporama_rsc_2.2.devel.2014.0503.tar.gz)
1) Extract the file in your preferred workspace.
2) Compilation:
qmake /PREFIX=/usr -o Makefile ffDiaporama_rsc.pro
make
3) Installation:
sudo make install
Installing ffDiaporama Main (ffdiaporama_bin_2.2.devel.2014.0701.tar.gz)
1) Extract the file in your preferred workspace.
2) Compilation:
qmake ffDiaporama.pro /PREFIX=/usr
make
3) Installation:
sudo make install
Installing ffDiaporama Texturemate
(ffdiaporama_texturemate_1.0.2014.0125.tar.gz)
1) Extract the file in your preferred workspace.
2) Compilation:
qmake ffDiaporama_texturemate.pro CONFIG+=release
make
3) Installation:
sudo make install
Installing ffDiaporama Openclipart
1) sudo dnf install openclipart
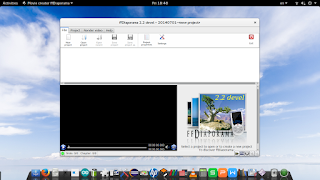
Happy making your Video Presentation on Fedora 23!
Follow my blog with Bloglovin
As the maintainer for ffDiaporama is not maintaining the project, i decided to try out the development version which tends to be ahead of the stable version.
Select the Linux button from ffDiaporama Landing site (http://ffdiaporama.tuxfamily.org/?page_id=3635) .
We shall see this page.

There is a script for Fedora, but i can't seem to get it to work. Hence, i downloaded the zip files found under the section "Other cases".
Download the three files, Resource package – Source files package,Application package – Source files package, Texturemate extension – Source files package.Installing Qmake and other prequisites
Go for Qt5
Installation prerequisites:
sudo dnf groupinstall development-tools
sudo dnf install gcc-c++
sudo dnf install qt5-qtbase-devel qt5-qttools-devel qt5-qtsvg-devel qt5-qtbase qt5-qttools qt5-qtsvg qt5-qtimageformats qt5-qtmultimedia-devel qt5-qtmultimedia qt5-qtdeclarative-devel
sudo dnf install ffmpeg ffmpeg-devel
sudo dnf install SDL SDL-devel SDL_mixer-devel SDL_mixer
sudo dnf install exiv2 exiv2-devel
cd
test -d bin || mkdir bin
cd bin
ln -s /usr/bin/qmake-qt5 qmake
ln -s /usr/bin/lrelease-qt5 lrelease
NB: If previous "symbolic link" (to earlier Qt, e.g. Qt3 and Qt4, exists, please remove them (e.g. sudo rm qmake) and relink again (e.g. ln -s /usr/bin/qmake-qt5 qmake)
Editing Header files (cDeviceModelDef.h & -EncodeVideo.cpp)
NB: Prior to install "ffDiaporama.zip" if you r using ffmpeg 2.8.7 (or above, which i believe applicable to higher version)
#define RESAMPLE_MAX_CHANNELS SWR_CH_MAX
to
#define RESAMPLE_MAX_CHANNELS 32
in cDeviceModelDef.h
Add in
VideoStream->time_base = VideoFrameRate;
//ffmpeg 2.8.7 and above
right after the line
VideoStream->codec->time_base = VideoFrameRate;
in _EncodeVideo.cpp.
Installing ffDiaporama
NB: Do install ffDiaporama Resource before ffDiaporama Main. After installing ffDiaporama Main, you may proceed to install plugin like Texturemate and Openclipart.
Installing ffDiaporama Resource (ffdiaporama_rsc_2.2.devel.2014.0503.tar.gz)
1) Extract the file in your preferred workspace.
2) Compilation:
qmake /PREFIX=/usr -o Makefile ffDiaporama_rsc.pro
make
3) Installation:
sudo make install
Installing ffDiaporama Main (ffdiaporama_bin_2.2.devel.2014.0701.tar.gz)
1) Extract the file in your preferred workspace.
2) Compilation:
qmake ffDiaporama.pro /PREFIX=/usr
make
3) Installation:
sudo make install
Installing ffDiaporama Texturemate
(ffdiaporama_texturemate_1.0.2014.0125.tar.gz)
1) Extract the file in your preferred workspace.
2) Compilation:
qmake ffDiaporama_texturemate.pro CONFIG+=release
make
3) Installation:
sudo make install
Installing ffDiaporama Openclipart
1) sudo dnf install openclipart
Happy making your Video Presentation on Fedora 23!


No comments:
Post a Comment